Retro Chip Tester - Firmware Upgrade with Raspberry Pi
Retro Chip Tester - Firmware Upgrade with Raspberry Pi

https://8bit-museum.de/sonstiges/hardware-projekte/hardware-projekte-chip-tester-english/
As a certified addict of vintage test equipment, I have been a big fan of Stephan's chip tester for some time now. I use it a lot to check TTL logic chips as good or bad. Also SRAM from the classic Tektronix TDS 'scope series. It is quick and easy to use.
I have had mine for a while now, and have been aware that a number of new firmware releases exist since mine arrived. From a quick read of the instructions, however, it was clear that a bit of learning and some kit would be needed, so never got around to doing it. Until now.
Over the years I have developed a keen dislike for MS Windows, so am predominantly a Mac and Linux user. This does have a downside, in that a lot of tech nerdy stuff revolves around Windows. Another reason to delay launching in to the firmware upgrade.
However, I have now successfully done it using a Raspberry Pi, and partly so I will remember how to do it next time, here are the steps.
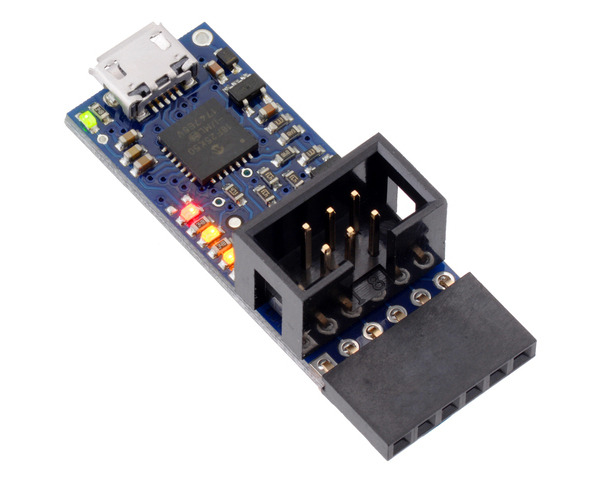
1. A USB programmer adapter is needed to talk to the tester. I chose the Pololu version. This guy:

 |
| Connector plugged in this way round! |
You can buy it with a cable that plugs into J11 on the tester board.
2. Download the AVR programming software from the Pololu website - they have a tar.xf file for the RPi. (https://www.pololu.com/resources/software)
(I'm assuming you know how to work from a Terminal window.)
Extract the file:
tar xf <filename>
CD to the extracted directory.
sudo ./install.sh
Then run pavr2gui, which will open a GUI window. I found the adapter was recognised by default and connected to the software.
From the setp-up menu, make sure;
- VCC Output is disabled
- ISP Frequency is 444kHz
- Line A function is disabled
- Line B Function is disabled.
3. Download the latest firmware release from Stephan's website (you will need your original login details provided when you bought the chip tester.)
https://8bit-museum.de/hardware-projekte-chip-tester-firmware/
This will be a zip file, so extract it in the normal way (from the file viewer is simplest)
4. Open a new Terminal window and CD to the folder where you extracted the firmware. You will need avrdude for this step and, if like me, you use the Arduino IDE, then it is highly likely that this is installed already on your RPi.
So then type this command:
avrdude "avrdude.conf" -v -patmega2560 -cstk500 -P/dev/ttyACM0 -b115200 -Uflash:w:Chip-TesterPro-FW-v0.**.hex:i
Change ** for the actual version numbers, and you might need to check that /dev/ttyACM0 is the correct port that your adapter is connected to. It will be shown on the avrdude GUI.
This should then run through the erase - programme - check sequence, including checking the fuses.
Job done. Happy days. And a big thank you to Stephan for all his hard work.


Comments
Post a Comment